Regardless of the time spent on a roof,the risk of falling is high. Any fall is likely to result in a serious injury. Safety nets installed below a high-level work area reduce the distance that a worker can fall.
They absorb the impact of the fall and provide a ‘soft landing’ to reduce the likelihood of a person being injured.
Safety nets are collective fall arrest systems, not fall restraint systems. That is, they provide passive protection from falls while allowing people to work at height without restricting their movement.
Collective fall arrest systems include:
- safety nets
- soft landing systems, or fall arrest mats.
PURPOSE:
This Best Practice Guideline covers the safety requirements and safe use of safety nets to protect people from being injured by a fall from a height. This information is for anyone who has to provide a safe place of work and make sure that all plant and equipment is safe.
It describes best practice for:
- safety net design principles
- types and classifications of safety nets
- safety net components
- installing of safety nets
- inspection, repair and maintenance of safety nets.
REFERENCED STANDARDS:
This guide follows the test methods,installation procedures & safety net positioning limits described in the following British and European codes of practice and standards:
- BS 8411 (Code of practice for safety nets on construction sites and other works)
- BS EN 1263-1 (Safety nets – Part 1: Safety requirements, test methods)
- BS EN 1263-2 (Safety nets – Part 2: Safety requirements for the positioning limits).
DEFINITIONS
Anchorage device (safety nets)
A device or system used to connect a safety net to the structure. May include tie ropes, karabiners or other attachment devices.
Anchor point
A fixing on the structure that the safety net is attached to.
Border rope:
A rope that passes through each mesh around the net’s perimeter and determines the net’s overall dimensions.
Class
The safety net classification based on the mesh size and energy absorption capacity.
Clearance distance
The distance below the net that must be kept clear of objects that a falling person might otherwise strike as the safety net deflects under their impact.
Coupling rope
The rope that joins two safety nets together.
Fall height
The vertical distance between a work platform and the safety net.
Initial sag
The amount of sag due to the net’s self-weight.
Mesh
A series of ropes arranged in either a square or diamond pattern to form a net.
Mesh rope
The rope used to make the net’s meshes.
Mesh size
The distance from centre to centre of the mesh.
Net system
The safety net, tie ropes or other anchorage devices, and the supporting structure linked together to provide a collective fall arrest system.
Safety net
The combination of mesh, border ropes, test meshes and labels of the net.
Supporting structure
The structure to which the safety net is attached.
PRINCIPLES OF SAFETY NET DESIGN
Safety nets are designed to progressively deflect (stretch) and absorb the energy of a fall, so a falling person is less likely to be injured. The greater the fall height, the greater the impact; so the net’s deflection must also be greater. The safety net must be able to deform or deflect enough to absorb all of the energy from the fall’s impact up to the maximum fall height for the design.
There must be enough clear distance below the net so that the person falling does not hit an obstacle or the ground while the net is deflecting.
SAFETY NET SYSTEMS
This guideline is for ‘System S’ safety nets, which are horizontally-installed safety nets with a continuous border rope. Safety nets may be either knotted or knotless with a square (Q) or diamond (D) mesh arrangement.
Notes:
- When a load lands on a knotted net, the knots near the impact tighten.The tightening is permanent and reduces the amount of energy the net can absorb from further impacts. Knotless nets do not have this problem.
- A person who falls onto a knotless net is less likely to receive facial injuries.
- Square mesh is more popular than diamond mesh, with no obvious reason for the preference, according to research in the UK.
- Square mesh has less sag when rigged so at its mid-point, it is closer to the work level.
SAFETY NET CLASSIFICATION
BS EN 1263-1 lists four classes of nets:
- Classes A and B describe the net’s maximum energy absorption capacity (that is, how much energy it can absorb), measured in kilojoules (kJ). For example: class A = 2.3 kJ; class B = 4.4 kJ
- classes 1 and 2 describe the mesh sizes. For example: class 1 = 60 mm; class 2 = 100 mm.
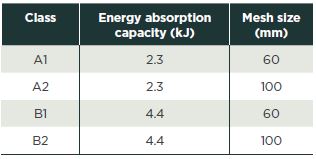
Table 1 sets out the net classifications.
Both classes A1 and A2 nets are suitable for system S safety nets. Class A2 nets (2.3 kJ energy absorption capacity and 100 mm mesh size) are most commonly used as the larger mesh size is lighter and has less initial sag.
Mesh rope:
Mesh rope should be made from at least three separate strands, braided so they cannot unravel. It should be tested according to BS EN 1263-1, clause 7.3.
Border rope:
A border rope is a continuous rope passing through each mesh around the perimeter of S safety nets. It should have a minimum tensile strength of 30kN, and be tested according to BS EN 1263-1, clause 7.5.
Tie rope:
Tie ropes fasten the safety net to the structural elements and/or the anchor points on the structure being netted. They should have a minimum tensile strength of 30kN and be tested according to BS EN 1263-1, clause 7.5.
Coupling rope:
Coupling ropes join safety nets together when more than one net is needed to protect an area. They should have a minimum tensile strength of 7.5kN and tested according to BS EN 1263-1, clause 7.5.
SAFETY NET LABEL
All safety nets should have a label showing the:
- manufacturer’s name and article code
- date of manufacture
- class and size of net
- mesh size and configuration
- net’s unique identity or serial number (ID)
- net’s minimum energy absorption capacity
- type of ongoing net inspections.
The label must be permanently attached to the net and be legible throughout the net’s life.
SIZE OF SAFETY NETS
BS EN 1263-2 only applies to safety nets over 35 m2 and where the shortest side is at least
5.0 metres.
If the fall height is over 2.0 metres, the safety net must:
- be larger than 35m2
- have the shortest side at least 5.0 metres, and
- have a maximum fixing spacing of 2.5 metres.
SAFETY NETS LESS THAN 35 M2
If a load falls onto a net less than 35 m2, the small net area means there will be less deflection and more limited energy absorption compared to nets with a larger area. System S safety nets that are less than 35 m2 are not covered by BS EN 1263-2.
FALL HEIGHT
The fall height is the distance a person will fall from the work platform onto the safety net – see Figure 2. A greater fall height results in a greater fall impact.
Keep the fall height as low as possible by installing safety nets as close as practicably possible below the work platform. Where possible, install nets no more than 2.0 metres below the work platform. Note that BS EN 1263-2 allows a maximum fall height of 6.0 metres (this gives a nominal fall height of 7.0 metres from a person’s centre of gravity) but this applies only to nets that are more than 35 m2 (see section 2.10 Size of safety nets).
Within 2.0 metres of the net’s outer edges, the fall height between the work platform and net should be no more than 3.0 metres. This is because safety nets cannot deflect as much at corners and edges (BS EN 1263-2).
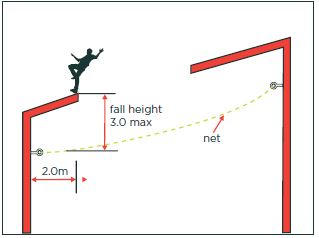
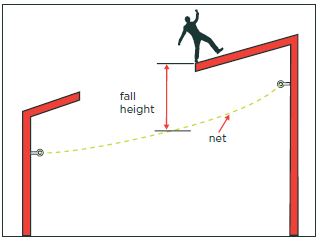
Figure 2: Fall heights. Figure 3: Fall height with 2.0 m of outer edge of net.
CLEARANCE DISTANCES
There must be enough clearance below the safety net to allow for it to deform when a person falls onto it. The amount it will deform depends on the height of the fall and the span of the net. See Figure 4.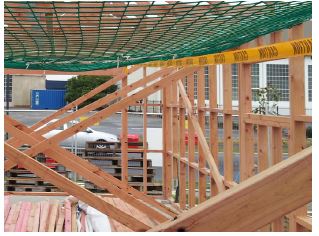
The graph in Figure 5 (from BS EN 1263-2: Figure 4) shows typical deformation when an object lands on the net. It is based on fall height and can be used to calculate the minimum clearance distance needed below the net, but only applies where the:
- area of the net is more than 35 m2
- shortest side of the net is at least 5.0 m
- initial sag is no more than 10% of the smallest side of the net, and
- fall height is no more than 6.0m . Figure 4
Figure-4 Temporary bracing means that there is not enough clearance below the nets. A person fallingonto the net is likely to strike the timber bracing.This is not best practice.
As an additional safety factor BS 8411: 2007recommends allowing an extra 0.5 metreclearance below the net.

Figure 5: Deformation of net when an object falls on it.
NET SAG: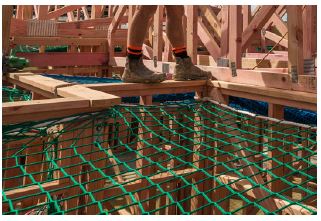
Net sag, or initial sag, is the amount of deformation from the net’s own weight. Net sag should be between 5% and 10% of the net’s shortest side.To have enough initial sag, the safety net should be at least 10% larger (along both sides) than the area it is going to cover. Excess netting should be under-rolled into the tie rope or attachment system (see Under-rolling) to spread the load evenly and avoid too much stress on individual meshes.
Figure-6 Safety net with between5-10% initial sag.
OVER-TENSIONING AND UNDER-TENSIONING
Safety nets should not be over-tensioned as they must be able to deflect and absorb energy from the impact of a fall. An overtensioned net, or a net with too many fixing points, may not be able to deflect enough. In either case, the impact on the person falling onto the net increases, as well as increasing
the load imposed on the net and structure. An under-tensioned net may deflect too much and if there isn’t enough clearance below the net, a falling person may hit an obstacle or the ground.
CATCHING WIDTH
If a person trips when they are moving forward, they fall forward as well as downward. The distance they fall forward is affected by the height of the fall; that is, the higher the fall, the further the forward movement. Nets providing protection at the edge of a work platform must be wide enough to include
the falling person’s forward movement – see Figure 7. The width of the net between the edge of the work platform and the outer edge of the safety net is called the catching width.
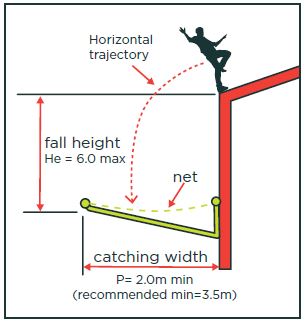
Figure 7: Catching width
BS EN 1263-2: Table 2 sets out minimum catching widths for maximum fall heights – see Table 2 of this guide. As an added safety factor, BS 8411 recommends extending the net at least 1.5 metres beyond the distances given in Table 2 of BS EN 1263-2.
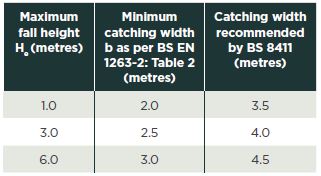
Table 2: Catching widths for maximum fall heights
(from BS EN 1263:2, Table 2 and Clause 4.3).
Cathching width where the slope of the working platform is more 20 deg:
If the slope of the working platform is more than 20°:
- the catching width must be at least 3.0 metres, and
- the distance (t) between the work platform’s edge and the lowest point of the safety net’s outside edge should be no more than 3.0 metres. See Figure 9.
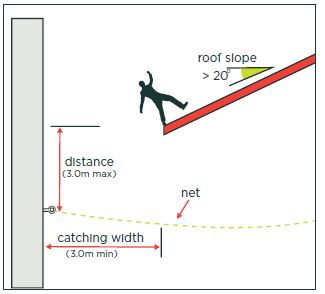
Figure 8: Fall heights where working platform has a slope of more than 20 deg.
PLANNING:
Plan the installation before installing a safety net. You should consider:
- the installation (rigging) and dismantling (striking) sequence
- providing and locating anchor points
- how to keep the right clearance distance below the safety net
- the means of access for rigging and striking
- he means of access for inspection, temporary repairs and removing debris, and
- a rescue plan.
Planning should include everyone involved in supplying, installing and using nets, including:
- the permanent works designer
- net supplier/installer
- main contractor/site supervisor
- roofing contractor.
Designer's Role:
The designer’s role includes:
- designing suitable anchorage points
- avoiding details that make safety net installation difficult or dangerous.
INSTALLER’S ROLE
The installer rigs (installs) and strikes (dismantles) the nets. Before starting installation, the installer should give the main contractor or site supervisor information about:
- their training and qualifications2 for installing safety nets
- the testing, maintenance and energy absorption capacity of the nets
- the plant they intend to use to install the nets
- the access facilities they need
- the anchor points and/or fixing requirements
- clearance distance requirements
- a rescue plan
- how to protect workers below the net.
They should also:
- check anchor points
- make sure anchor points are suitable for the loads
- make sure the nets are fit for purpose
- make sure there is enough clearance under the nets.
Once the nets have been installed, the installer should give handover documentation to the main contractor/site supervisor. The documents should verify the safety net system is fit for purpose, as well as giving written instructions on:
- rescue procedures
- inspection procedures
- removing debris from the nets.
The installer should also give verbal instructions on all procedures. Everyone who may be involved in a rescue must have rescue training.
SAFETY NET INSTALLATION HIERARCHY
A hierarchy of safety net installation minimises risk to the riggers. The hierarchy goes from low to high risk as follows:
1. At ground level with a remote anchorage attachment
2. Using a mobile elevating work platform (MEWP). See Figure 9.
3. Using a ladder for short-duration work, but only after carrying out a hazard assessment
4. Using rope access techniques. Figure 9
Notes: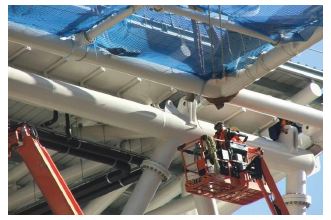
1. Mobile access towers (or mobile scaffoldtowers) are not recommended for installing safety nets as they can catch in the nets when moving around.
2. Rope access work is highly specialised. Only trained and competent people should do rope access work.
Figure 9: Safety net installation using a mobile elevating work platform.
Inspecting net before installation:
Before installing the nets, the installer should:
- examine the safety nets on both sides for damage or defects
- check the net’s labels (manufacturer’s and removable test mesh) are displayed, current and valid.
If the installer finds any damage or defects, the net should not be used. If the damage is reparable, the net may be repaired; otherwise it must be withdrawn from service. If a label is not attached, or the label’s information is not legible, do not use the net.
Installation (Generally)
- Install safety nets as close as possible to the work platform.
- Rig safety nets to follow the roof line.
- Nets should not restrict the construction work.
Ceiling battens must not be installed until the safety nets have been removed. If they are installed before or with safety nets in place, the battens will be the first obstacle the falling person hits. Before installing nets near live wires or overhead power cables, contact the line owner to make the wires or cabling safe.
Net Access:
Nets must be easily accessible to carry out a rescue or clear debris. Provide access by:
- installing the nets next to a work platform
- installing the nets next to the work platform’s access point
- providing an access platform next to the net.
People should be able to remove debris fromthe nets without walking on them. Do not usesafety nets to collect debris, for storage, as a work platform, or for providing access to a work platform.
Anchor Points:
Safety nets are attached with tie ropes or karabiners to the supporting structure or to specifically-designed anchor points on the structure.Based on a maximum fall height of 6 metres and an assumed load angle of 45°to the horizontal, each anchor point should have a 6 kN minimum load carrying capacity– see Figure 10. The combined load-carrying capacity of the supporting structure applied over three adjacent anchor points should be at least 4 kN, 6 kN, 4 kN.
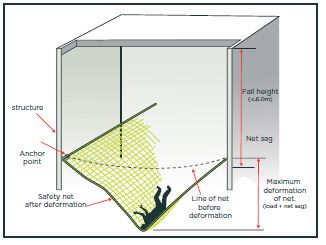
Figure 10: Minimum load-carrying capacity of anchor points.
The maximum distance between anchor points according to BS EN1263-2 is 2.5metres recommends installing anchor points at between 1.5 and 2.0 metre centres.
Safety nets used in residential, timber frame construction may need to be attached at closer centres.
Anchor points and the supporting structure that the safety nets are fastened to must not have sharp edges that could rub on the tie ropes.
Attaching safety nets to steel structure:
Safety nets may be attached directly to hot-rolled, structural steel members such as trusses, rafters, portal frames and purlin support cleats. Do not attach safety nets to gutter supports, pipework or electrical service installations.
Cold-formed sections such as purlins, ceiling battens and scaffolding tubes should not be used unless calculations show they are strong enough for the load.
Attaching safety net to timber structure:
Safety nets may be attached to timber structures such as rafters and top plates. Do not attach safety nets to timber purlins or ceiling battens.
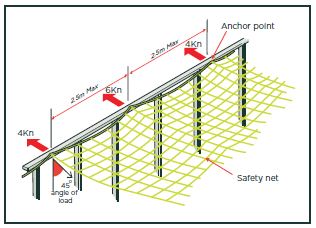
Figure 11: Attaching safety nets to timber structures
Eaves bagging
Where anchor points are widely spaced (see section 4.4 Anchor points), the safety net’s edge may pull in or ‘waist’, leaving a gap that a person could fall through. If waisting occurs, make an ‘eaves bag’ by folding approximately 2.0 metres of net back on itself and stitching the sides together to create a bag around 1.0 metre deep. See Figure 12.
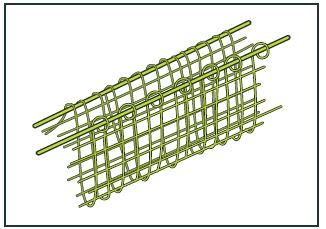
Figure 12: Eaves bagging.
Gaps at net edges:
There should be no gaps between the safety net and the adjacent structure. If unavoidable, gaps of up to 100mm are allowed. If there are obstructions (for example, around columns), a gap of no more than 225 mm is allowed but it must not be able to get any larger.
Joining and over laping:
If more than one net is needed to protect an area, join nets by: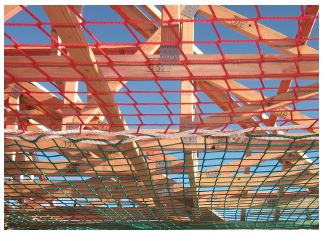
- lacing, or
- overlapping.
Safety nets can be laced together using a coupling rope with a minimum 7.5 kN breaking strain (type O or greater as defined in BS EN 1263-1). The coupling rope must pass through every second mesh and around both border ropes. Tie the ends off at the corners. The completed lacing should give a join with gaps no more than 100mm.
Figure 13: Safety nets joined by lacing.
If joining nets by overlapping, the overlap must be at least 2.0 meters (or 20 meshes) wide, measured at the narrowest point for the entire length of the overlap. Nets that follow the slope of the roof should be installed with the upper net overlapping the lower net (referred to as ‘tiling’) so that if a person falls, they will not roll down the pitch and off the open end.
HANDOVER DOCUMENTATION
Once installed, the installer must inspect the safety net to make sure it is correctly installed and fit for purpose. They must then give handover documentation to the main contractor or site supervisor that includes:
- confirmation that all safety net components comply with BS EN 1263: parts 1 or equivalent
- confirmation that the safety net was installed in accordance with BS 8411 and BS EN 1263-2 or equivalent
- a description of the area being ‘handed over’
- evidence that the safety nets were tested within the past 12 months.
An instruction manual for the nets including information on:
- installation, use and dismantling
- storage, care and inspection
- dates for testing test meshes
- conditions for removing safety nets from service
- hazards (such as heat, chemicals, etc)
- written instructions on rescue, inspection and debris removal procedures
- the name of the person who inspected the net, the handover date, and the signature of the person receiving the handover documentation.
The main contractor or site supervisor must keep the documentation on site for the duration of the construction project.
The safety net system should have a label with the:
- installer’s name
- handover date
- description and area of net
- net serial or ID numbers
- clearance distance needed under the nets.
If there is no handover documentation, you should regard the nets as unsuitable for use. Do not carry out work above the nets until the installer provides documentation.
DISMANTLING (STRIKING):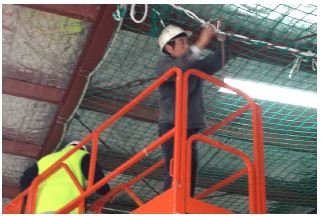
Dismantling (striking) safety nets is the reverse process to installation. Safety nets should only be dismantled by trained installers who can identify and mark net damage.
Plan the dismantling process during the net installation planning stage, to recover the nets safely and intact. Do not drop nets to the ground in an uncontrolled way during dismantling, as damaged nets may not be able to be re-used.
INSPECTIONS
Visual inspections of the safety nets must be carried out regularly by a competent person. An inspection regime is given in Table 3. Records of all inspections must be kept on site.
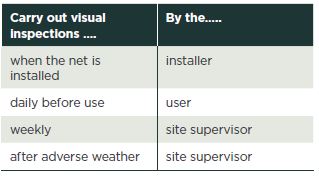
Table 3: Frequency of net inspections.
Visual inspections include checking for:
- incorrect installation
- mesh abrasion
- cuts or nicks in mesh
- heat or friction damage to mesh
- stitching damage
- damaged or deformed fittings
- dirt or debris in the net
- defects in knots (if knotted mesh)
- UV degradation (although generally not seen with visual inspection). If a net does not pass the visual inspection, do not use it. Either remove and repair it, or take it out of service permanently.
TESTING FOR UV DETERIORATION:
Test safety nets at least every 12 months to determine the amount of UV deterioration and to make sure the manufacturer’s minimum energy absorption capacity will be maintained for the next 12 months.
Test meshes ) are attached to the safety net and removed one at a time for annual testing. Test meshes must remain attached to the net until needed for testing. Do not use test meshes for any other purpose.
Nets more than 12 months old must have a current test tag or label attached to the net to confirm the net met the manufacturer’s energy absorption capacity requirements at the most recent testing. Keep the corresponding certificate with details on site. The test tag and certificate must not expire while the net is in use. Test methods for UV deterioration are described in BS EN 1263-1: clause 7.7.
DEBRIS IN THE NET
Safety nets catch a falling person, but they will also catch falling debris. Debris can damage the net, and if left in the net is a hazard because it might: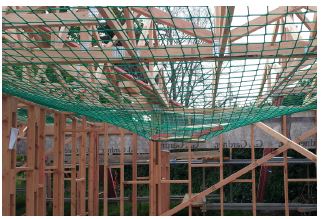
- injure a falling person
- cause the net to overload and deflect excessively
- increase the net sag and fall distance.
When debris falls onto a safety net, immediately stop work above and below the net. Remove the debris, and have the net checked for damage by a competent person before work continues.
Recommends one person on site is responsible for keeping safety nets free of debris.
Note: Snow on the safety net can overload the net and cause excessive deflection.
NET CARE
Do not damage nets during handling and storage. Damage may occur from:
- prolonged UV exposure
- sharp objects
- abrasion
- sparks or exposure to heat from welding, grinding or burning
- adverse weather such as strong winds
- significant load or impact.
When handling nets during rigging or striking:
- do not drag nets across the ground
- avoid contact with sharp edges.
When installing nets, do not:
- stack material onto the net
- let debris accumulate in the net
- allow people to jump or throw objects into the net.
REPAIRING SAFETY NETS AND ROPES
Safety nets must be repaired by a competent person (i.e. someone who has completed a recognized training course within the past 5 years). Nets should preferably be repaired in a controlled environment, away from the site. Repairs must be made using new material that is similar to the net mesh cord and recommended for use by the manufacturer. Cable ties must not be used as a net repair, although they may be used to hold a patch in place before stitching or to tie up the loose ends of a patch.
A label showing the repairer and date of repair must be fixed to the net next to the manufacturer’s label. The repairs must also be recorded and another handover certificate confirming that the safety net remains fit for purpose, should be given to the main contractor or site supervisor.
Border rope repairs must be made using rope with at least 30kN tensile strength. Repairs may be spliced or machine sewn but must not be knotted. Repairs to the net selvage should maintain the original strength of the net.Damaged tie ropes should not be used.
C-Ring and other proprietary repair systems may only be used on safety net systems if they have been approved by the manufacturer as suitable for that net.
REPAIRING A KNOT LESS SAFETY NET
When multiple meshes of a knot less net are damaged, the net should be repaired using new patch material that has been approved by the manufacturer as being suitable for their net, and which complies with BS EN 1263-1.The repair should overlap the entire area that is damaged by at least
one mesh. A patch may be laced to the safety net using lacing repair twine to attach all meshes
(both the inside and perimeter meshes). Alternatively cable ties may be used to attach the inside meshes of the patch but perimeter meshes must be laced using repair twine.
Single mesh repairs should extend at least one square past the damage, and the repair twine must cross the damaged hole twice. Repairs should not overlap. Repair twine should be at least 3mm thick and double knotted on either side of each node should not overlap. Repair twine should be at least 3mm thick and double knotted on either side of each node.
STORING SAFETY NETS
Store safety nets:
- undercover
- in dry conditions
- protected from UV
- away from heat sources and materials or substances that could cause damage, like acids, dyes, solvents and oil. If a safety net has been stored for more than 12 months, it must be inspected and tested for UV deterioration before being re-used.
Click the below image to download the safety net documents

Safety Net - Safety guidelines
Safety Net - Handover check sheet
Safety Net - Visual safety check sheet