Materials Handling :
For an effective materials handling and storage program, managers must take an active role in its development. First-line supervisors must be convinced of the importance of controlling hazards associated with materials handling and storing and must be held accountable for employee material handling safety training. Safe lifting is only one aspect of material handling; transporting the load safely is the other. How you move or carry and put down the load is just as important as how you pick it up.
Moving, Handling, and Storing Materials:
When manually moving materials, employees should seek help when a load is so bulky it cannot be properly grasped or lifted, when they cannot see around or over it, or when they cannot safely handle the load.
Handles or holders should be attached to loads to reduce the chances of getting fingers pinched or smashed. Workers also should use appropriate protective equipment. For loads with sharp or rough edges, wear gloves or other hand and forearm protection. In addition, to avoid injuries to the eyes, use eye protection. When the loads are heavy or bulky, the mover also should wear steel-toed safety shoes or boots to prevent foot injuries if he or she slips or accidentally drops a load.
All stacked loads must be correctly piled and cross-tiered, where possible. Precautions also should be taken when stacking and storing material. Stored materials must not create a hazard. Storage areas must be kept free from accumulated materials that cause tripping, fires, or explosions, or that may contribute to the harboring of rats and other pests.
When stacking and piling materials, it is important to be aware of such factors as the materials’ height and weight, how accessible the stored materials are to the user, and the condition of the containers where the materials are being stored. Non-compatible material must be separated in storage. Employees who work on stored materials in silos, hoppers, or tanks, must be equipped with lifelines and safety belts.
All bound material should be stacked, placed on racks, blocked, interlocked, or otherwise secured to prevent it from sliding, falling, or collapsing. A load greater than that approved by a building official may not be placed on any floor of a building or other structure. Where applicable, load limits approved by the building inspector should be conspicuously posted in all storage areas.
When stacking materials, height limitations should be observed. For example, lumber must be stacked no more than 16 feet high if it is handled manually; 20 feet is the maximum stacking height if a forklift is used. For quick reference, walls or posts may be painted with stripes to indicate maximum stacking heights.
Used lumber must have all nails removed before stacking. Lumber must be stacked and leveled on solidly supported bracing. The stacks must be stable and self-supporting. Stacks of loose bricks should not be more than 7 feet in height. When these stacks reach a height of 4 feet, they should be tapered back 2 inches for every foot of height above the 4-foot level. When masonry blocks are stacked higher than 6 feet, the stacks should be tapered back one-half block for each tier above the 6-foot level. Bags and bundles must be stacked in interlocking rows to remain secure. Bagged material must be stacked by stepping back the layers and cross-keying the bags at least every ten layers. To remove bags from the stack, start from the top row first. Baled paper and rags stored inside a building must not be closer than 18 inches to the walls, partitions, or sprinkler heads.
Check chain slings during inspection:
A competent person should inspect chain slings periodically, according to the manufacturer's recommendations. For record keeping purposes it is useful if each chain has a metal tag with an identification number and load limit information. Information about the chain length and other characteristics and an inspection schedule should be recorded in a log book.
- Clean sling before inspection.
- Hang the chain up or stretch the chain out on a level floor in a well-lighted area. Remove all twists. Measure the sling length. Discard if a sling has been stretched.
- Make a link-by-link inspection and discard if:
a) Wear exceeds 15% of a link diameter.

Cut, nicked, cracked, gouged, burned, or corrosion pitted.

c) Twisted or bent.
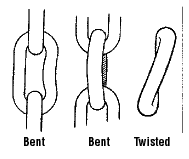
d) Stretched. Links tend to close up and get longer.

- Check master link, load pins and hooks for any of the above faults. Hooks should be removed from service if they have been opened more than 15% of the normal throat opening, measured at the narrowest point, or twisted more than 10° from the plane of the unbent hook.
- Manufacturers' reference charts show sling and hitch capacities. Record manufacturer, type, load limit and inspection dates.
Use chain slings safely:
- Always know how to properly use the equipment, slinging procedures before attempting the lift operation.
- Inspect the slings and accessories before use for any defects.
- Replace broken safety latches.
- Find out load weight before lifting.
- Check whether chain slings fit freely. Do not force, hammer or wedge chain slings or fittings into position.
- Keep hands and fingers from between load and chain when tensioning slings and when landing loads.
- Ensure the load is free to be lifted.
- Make a trial lift and trial lower to ensure the load is balanced, stable and secure.
- Balance the load to avoid overstress on one sling arm or the load slipping free.
- Lower the working load limit if severe impact may occur.
- Pad sharp corners to prevent bending links and to protect the load.
- Position hooks of multi-leg slings facing outward from the load.
- Do not leave suspended loads unattended.
- Cordon off the area.
- Reduce the load limit when using chain in temperatures above 425°C (800°F).
- Store chain sling arms on racks in assigned areas and not lying on the ground. The storage area should be dry, clean and free of any contaminants which may harm the sling.
Materials Handling - Lifting With Eye Bolts:
How should you select the right bolt:
Eye bolts are marked with their thread size NOT with their rated capacities. Make sure you select the correct eyebolt based on its type and capacity for the lift you are conducting.
- Use plain or regular eye bolts (non-shoulder) or ring bolts for vertical loading only. Angle loading on non-shoulder bolts will bend or break them.
- Use shoulder eye bolts for vertical or angle loading. Be aware that lifting eye bolts at an angle reduces the safe load.
- Follow the manufacturer's recommended method for angle loading.
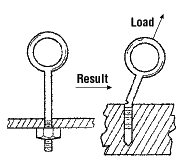
Incorrect use of shoulder bolt
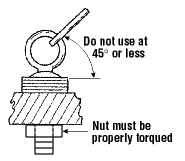
Shoulder eye bolt with load correctly applied
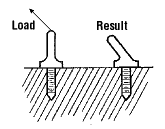
Incorrect way of applying angle load
Use eye bolts safely:
- Orient the eye bolt in line with the slings. If the load is applied sideways, the eye bolt may bend.
- Pack washers between the shoulder and the load surface to ensure that the eye bolt firmly contacts the surface. Ensure that the nut is properly torqued.
- Engage at least 90% of threads in a receiving hole when using shims or washers.
- Attach only one sling leg to each eye bolt.
- Inspect and clean the eye bolt threads and the hole.
- Screw the eye bolt on all the way down and properly seat.
- Ensure the tapped hole for a screw eye bolt (body bolts) has a minimum depth of one-and-a-half times the bolt diameter.
- Install the shoulder at right angles to the axis of the hole. The shoulder should be in full contact with the surface of the object being lifted.
- Use a spreader bar with regular (non-shoulder) eye bolts to keep the lift angle at 90° to the horizontal.
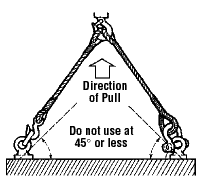
- Use eye bolts at a horizontal angle greater than 45°. Sling strength at 45° is 71% of vertical sling capacity. Eye bolt strength at 45° horizontal angle drops down to 30% of vertical lifting capacity.
- Use a swivel hoist ring for angled lifts. The swivel hoist ring will adjust to any sling angle by rotating around the bolt and the hoisting eye pivots 180°.
What should you avoid when using eye bolts:
- Do not run a sling through a pair of eye bolts: this will reduce the effective angle of lift and will put more strain on the rigging.
- Do not force the slings through eye bolts. This force may alter the load and the angle of loading.
- Do not use eye bolts that have been ground, machined or stamped.
- Do not use bars, grips or wrenches to tighten eye bolts.
- Do not paint an eye bolt. The paint could cover up flaws.
- Do not force hooks or other fittings into the eye; they must fit freely.
- Do not shock load eye bolts.
- Do not use a single eye bolt to lift a load that is free to rotate.
- Do not use eye bolts that have worn threads or other flaws.
- Do not insert the point of a hook in an eye bolt. Use a shackle.

Materials Handling - Overhead Crane Operation
What should you do before moving a load:
- Ensure all loose materials, parts, blocking and packing have been removed from the load before lifting.
- Remove any slack from the sling and hoisting ropes before lifting the load.
- Make sure that the lifting device seats in the saddle of the hook.
- Verify that the load is not heavier that the maximum load capacity.
How should you move loads safely:
- Move crane controls smoothly. Avoid abrupt, jerky movements of the load.
- Follow signals only from one slinger in charge of the lift, except a stop signal.
- Make sure everyone is away from the load before hoisting. Sound a bell, siren or other warning device and start to hoist slowly.
- Ensure nothing links or catches on the load while raising it or traveling.
- Ensure that nothing obstructs the movement of a load.
- Keep the load under control when lowering a load. If the braking system stops working, the load can usually be lowered by reversing the hoist controller to the first or second point.
- Do not lower the load below a level that corresponds to less than two full wraps of wire rope left on the drum.
- Stay in a crane cab during power failure. Place controls in "off" position, attract attention and wait for help.
What should you do before leaving the crane:
- Remove the load hanging on crane hooks.
- Raise all hooks to a mid-position.
- Spot the crane at a designated location.
- Before closing the main switch, make sure that all controllers are in the "off" position.
What should you avoid when operating an overhead crane:
- Do not carry anything in your hands when going up and down ladders. Items that are too large to go into pockets or belts should be lifted to or lowered from the crane by rope.
- Do not operate a crane if limit switches are out of order, or if cables show defects.
- Do not lower the blocks below the point where less than two full wraps of cable remain on the drum.
- Do not attempt lifts beyond the rated load capacity of a crane or slings.
- Do not lift a load from the side. Centre the crane directly over the load before hoisting to avoid swinging the load.
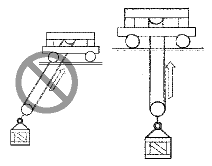
- Do not allow anyone to ride on a load or hooks.
- Do not leave slings dangling from the load hook. Have sling hooks placed on the sling ring when carrying slings to the load.
- Do not raise loads higher than necessary to clear objects.
- Do not pass a load over workers.
- Do not reverse a motor until it has come to a full stop except to avoid accidents.
- Do not walk on the crane runway.
- Do not leave suspended loads unattended.
Materials Handling - Synthetic Web Slings
Synthetic web slings are a good choice where highly finished parts or delicate equipment must be protected from damage. The synthetic material has stretch and flexibility to help the slings mold to the shape of the load, gripping securely, while cushioning and absorbing shock more than a wire rope or chain.
- They are lightweight and very easy to handle.
- They are non-sparking, non conductive and can be used safely in explosive atmospheres.
- Synthetic slings are typically not affected by grease, oil, moisture and certain chemicals. Check with the manufacturer to determine which conditions apply to the exact material you are using.
- Synthetic web slings are easily cut and have poor abrasion resistance when compared with chain and wire rope slings. Protect webbing from sharp corners, protrusions, or abrasive surfaces.
- Protect slings from heat sources such as steam pipes, open flame and welding splatter.
- Nylon slings are damaged by acids, but resist caustics.
- Polyester slings are damaged by caustics but resist acids.
- Wet frozen slings will have a reduced load capacity. Follow manufacturer's recommendations.
- Sunlight, moisture, and temperatures above 82.2°C (180°F) damage both nylon and polyester slings.
- Use slings made of the right material for the job.
- Check the manufacturers' slings for their code number and the rated capacity. Reference charts showing slings and hitch rated capacities are available from manufacturers.
- Inspect slings before using them.
- Keep an inspection record for each sling.
- Replace damaged slings, or repair only according to manufacturer's recommendations.
Materials Handling - Hoist Wire Rope:
visually inspect wire ropes:
- Use the "rag-and-visual" method to check for external damage. Grab the rope lightly and with a rag or cotton cloth, move the rag slowly along the wire. Broken wires will often "porcupine" (stick out) and these broken wires will snag on the rag. If the cloth catches, stop and visually assess the rope. It is also important to visually inspect the wire (without a rag). Some wire breaks will not porcupine.
- Measure the rope diameter. Compare the rope diameter measurements with the original diameter. If the measurements are different, this change indicates external and/or internal rope damage.
- Visually check for abrasions, corrosion, pitting, and lubrication inside rope. Insert a marlin spike beneath two strands and rotate to lift strands and open rope.
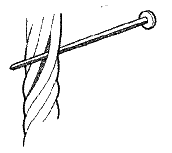
How to check the interior of the rope
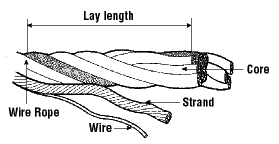
Wire rope elements
When should you stop using the rope and remove it from use:
Assess the condition of the rope at the section showing the most wear. Discard a wire rope if you find any of the following conditions:
- In running ropes (wound on drums or passed over sheaves), 6 or more broken wires in one rope lay length; 3 or more broken wires in one strand in one rope lay. (One rope lay is the distance necessary to complete one turn of the strand around the diameter of the rope.)
- In pendant standing ropes, 3 or more broken wires in one lay length.
- Wear of 1/3 of the original diameter of individual outside wires.
- Kinking, crushing, cutting or unstranding, bird caging or other physical damaged that has distorted the shape of the wire rope.
- Heat damage (check for burn marks, discoloration of the metal).
- Excessive stretch or sharp reduction in the rope diameter.
- Knots or splices (except eye splices) in a wire rope.
- Missing sling identification, such as manufacturer, workload limit, diameter or size.
What can cause a wire rope to break:
- Wear on areas in contact with hoist sheaves and drums.
- Corrosion from lack of lubrication and exposure to heat or moisture (e.g., wire rope shows signs of pitting). A fibre core rope will dry out and break at temperatures above 120°C (250°F).
- Fatigue from repeated bending even under normal operating conditions.
- Overloading the safe working load limit. Follow manufacturers' charts.
- Mechanical abuse - crushing, cutting or dragging of rope.
- Usage when frozen - if work is performed at lower than 15.5°C, the use of the sling should follow the manufacturer's recommendations.
- Kinks from improper installation of new rope, sudden release of a load or knots made to shorten a rope. A kink cannot be removed without creating a weak section. Discarding kinked rope is best.
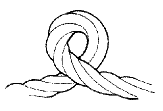
Kinked wire rope