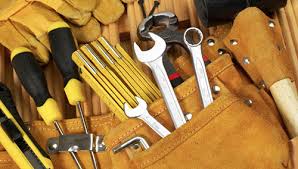
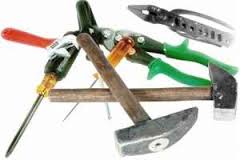
A hand tool is any tool that is not a power tool – that is, one powered by hand (manual labour) rather than by an engine. Some examples of hand tools are garden forks, secateurs, rakes, hammers, spanners, pliers, screwdrivers and chisels. Hand tools are generally less dangerous than power tools.
Hand tools are generally classified under the following categories.
- Clamps
- Cutting Tools for Bolts, Cables, and Strapping
- Gear Pullers
- General Hand Tool Operation
- Hammers
- Hand Saw
- Non-sparking tools
- Wrenches, Cutters, Reamers, and Threaders
- Pliers and Wire Cutters
- Screwdrivers
- Snips
- Struck Tools
- Vises
- Wood Chisels
- Wrenches
Clamps :
Clamps are versatile tools that serve to temporarily hold work securely in place. They are used for many applications including carpentry, woodworking, furniture making, welding, construction & metal working.
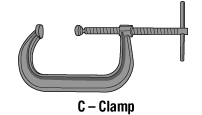
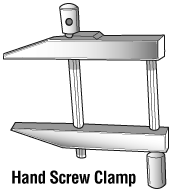
Clamp styles include C-clamps, bar clamps, pipe clamps, and hand screws. Bar clamps have adjustable arms that are easily widened or narrowed to fit the work piece & therefore, requires fewer turns of the screw spindle, compared to a C-clamp, to hold the piece tightly.
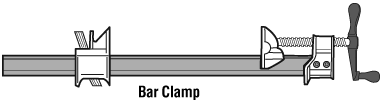
Proper use of a bar clamp:
- Used for woodwork, especially for holding edges when gluing.
- Apply clamping pressure at right angles to the glue line otherwise slippage may result.
Proper use of a c-clamp:
- Used for carpentry, welding or cutting.
Proper use of a hand screw clamp:
- Can be made of metal or wood.
- Used to hold small pieces or in furniture repair.
General safety tips to know when using clamps:
- Wear safety glasses or goggles, or a face shield (with safety glasses or goggles).
- Select the proper clamp style and size by matching the work-holding requirements of the job with the following clamp features:
- strength and weight (e.g., consider rail size and nominal clamping pressure)
- opening (length of reach)
- throat depth (depth of reach)
- ease of adjustment
- clamping surfaces (material used and size)
- Ensure that the swivel at the end of the screw turns freely before using.
- Dispose of clamps with bent frames; replace bent spindles, if possible.
- Ensure that the pressure plate and anvil parts of the clamp are in full contact with the work piece before tightening.
- Close the jaws until the clamp feels tight. For example, when gluing, some glue will be squeezed out, a sign that it is tight enough.
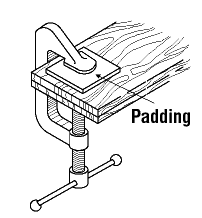
- Use pads with C-clamps to avoid marking the work.
- Remove clamps as soon as the job is finished. Clamps serve only as temporary devices for holding work securely in place.
- Keep all moving parts of clamps lightly oiled and keep tools clean to prevent slippage. Also make sure there is no dirt or oil on any part that will come in to contact with the work.
- Store C-clamps by clamping them in a rack, not in a drawer.
Dont's on clamps:
- Do not use extra large clamps just for the sake of their large throats. Instead, use, deep-throat clamps.
- Do not use any clamps that have a bent frame or a bent spindle.
- Do not use wrenches, pipes, hammers, or pliers to tighten clamps. Use wrenches only on clamps especially designed for wrenches.
- Do not hoist or pull with C-clamps. Use special lifting clamps.
- Do not use C-clamps to construct scaffolds or platforms for workers.
Cutting Tools for Bolts, Cables, and Strapping:
General safety tips to know when using cutting tools:
Many types and sizes of cutters are used for cutting selected metal products made from iron, steel, or softer, non-ferrous materials (e.g., copper, brass, aluminum). Cutters are designed to cut materials of different kinds of products such as wires, cables (electrical, coax, multi-strand), wire ropes, fencing, bolts, rods, pre-stressed concrete wires, and strapping.
- Wear safety glasses or goggles, or a face shield (with safety glasses or goggles) and protective gloves when using cutters.
- Choose the proper cutter for the job. Cutters are designed for a specific type, hardness, and size of material.
- Cut materials straight across - keep the material being cut at right angles to the cutting edges
of jaws.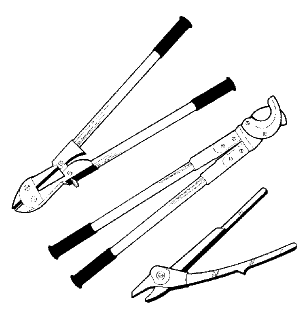
- Prevent injury from flying metal by wrapping a burlap bag, cloth or rag around the cutting jaws. Metal can fly when cut. The harder the metal, the farther it will fly.
- Warn those in the area to take precautionary measures to avoid possible injury from flying metal pieces.
- Keep cutting tools in good repair.
- Adjust and lubricate cutter and moving parts daily if heavily used.
- Sharpen jaws according to manufacturers' instructions.
Dont's :
- Do not use a cutting tool until you are trained in its proper and safe use.
- Do not use cushion grip handles for jobs requiring insulated handles. Cushion grips are for comfort primarily and do not protect against electric shock.
- Do not use cutters which are cracked, broken or loose.
- Do not exceed the recommended capacity of a tool.
- Do not cut diagonally.
- Do not rock cutters from side to side when cutting wire.
- Do not pry or twist with tool when cutting.
- Do not hammer on cutting tools or extend the handle length to achieve greater cutting power.
- Do not expose cutters to excessive heat.
- Do not repair cutters. Discard equipment that is cracked, broken or shows signs of damage.
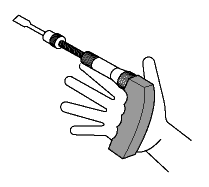
Gear Pullers:
Gear pullers are made in various shapes and sizes and have many uses. Always use the correct tool for the job.
- Wear safety glasses or goggles, or a face shield (with safety glasses or goggles).
- Select the proper gear puller for each job. Always use a gear puller of the required size or larger. Use a 3-jaw puller, if possible.
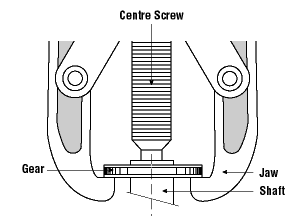
- Ensure that the gear puller is aligned with the shaft and fits tightly around the part to be removed. The jaws should be parallel with the screw. This assures a straight pull.
- Be careful when removing a stubborn gear or bearing. Always strike the head of the centre screw squarely. If after two sharp blows the gear or bearing remains stuck, select a larger puller and proceed to remove the gear or bearing.
- Use a protective cap or removable point to protect screw from mushrooming or splitting.
- Stop work if the gear puller starts to deform.
- Cover work with a cloth to protect you and by-standers from flying parts.
- Lubricate the centre screw with machine oil before use.
- Clean the gear puller after use and store it in a dry place.
Dont's on gear puller:
- Do not use air powered tools on gear pullers.
- Do not use any puller with functioning parts that show excessive wear, dents, or cracks. Inspect the centre screw for signs of galling or seizing.
- Do not heat any gear puller. It will lose its strength and break under pressure if heated.
- Do not cut or grind any part of a gear puller.
Hammers:
Safety tips to know when using a hammer:
Hammers and other striking tools are widely used and often abused. Hammers are made for specific purposes in various types and sizes, and with striking surfaces of varying hardness. For example, hammers are used for general carpentry, framing, nail pulling, cabinet making, assembling furniture, upholstering, finishing, riveting, bending or shaping metal, striking masonry drill and steel chisels, and so on. Hammers are designed according to the intended purpose.

- Select a hammer that is comfortable for you and that is the proper size and weight for the job. Misuse can cause the striking face to chip, possibly causing a serious injury.
- Choose a hammer with a striking face diameter approximately 12 mm (0.5 inch) larger than the face of the tool being struck (e.g., chisels, punches, wedges, etc.).
- Ensure that the head of the hammer is firmly attached to the handle.
- Replace loose, cracked or splintered handles.
- Discard any hammer with mushroomed or chipped face or with cracks in the claw or eye sections.
- Wear safety glasses or goggles, or a face shield (with safety glasses or goggles).
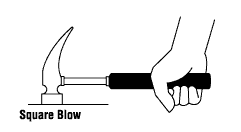
- Strike a hammer blow squarely with the striking face parallel to the surface being struck. Always avoid glancing blows and over and under strikes. (Hammers with bevelled faces are less likely to chip or spall.)
- Look behind and above you before swinging the hammer.
- Watch the object you are hitting.
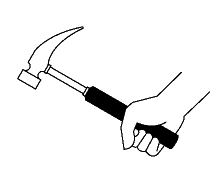
- Hold the hammer with your wrist straight and your hand firmly wrapped around the handle
Hand Saw:
Saws are made in various shapes and sizes and for many uses. Use the correct saw for the job.
- Wear safety glasses or goggles, or a face shield (with safety glasses or goggles).
- Select a saw of proper shape and size for stock being used.
- Select a saw with the number of teeth per inch (TPI) in order to get the desired finish. For example: a coarse tooth blade (e.g., 2 or 3 TPI) should be used for thicker stock. 18 to 32 TPI should be used on thinner metals or plastic (0.5 cm or 1/4 inch). General wood cutting typically requires about 4 TPI.
- Choose a saw handle that keeps wrist in a natural position in the horizontal plane.
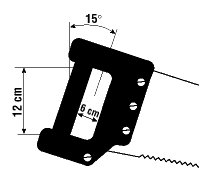
- Choose saw with a handle opening of at least 12 cm (5 in.) long and 6 cm (2.5 in.) wide and slanted at a 15° angle.
- Check the stock being cut for nails, knots, and other objects that may damage or buckle saw.
- Start the cut by placing your hand beside the cut mark with your thumb upright and pressing against blade. Start cut carefully and slowly to prevent blade from jumping. Pull upward until blade bites. Start with partial cut, then set saw at proper angle.
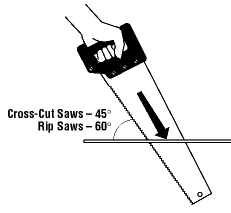
- Apply pressure on downstroke only.
- Hold stock being cut firmly in place.
- Use a helper, a supporting bench or vise to support long stock if required.
- Keep teeth and blades properly set.
- Protect teeth of saw when not in use.
- Keep saw blades clean.
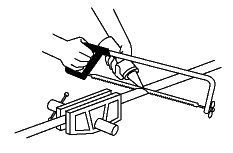
Using a hacksaw:
- Select correct blade for material being cut.
- Secure blade with the teeth pointing forward. Tighten the nut until the blade is under tension.
- Keep blade rigid, and frame properly aligned.
- Cut using steady strokes, directed away from you.
- Use entire length of blade in each cutting stroke.
- Use light machine oil on the blade to keep it from overheating and breaking.
- Cut harder materials more slowly than soft materials.
- Clamp thin, flat pieces requiring edge cutting.
- Keep saw blades clean and lightly oiled.
- Do not apply too much pressure on the blade as the blade may break.
- Do not twist when applying pressure.
- Do not use when the blade becomes loose in the frame.
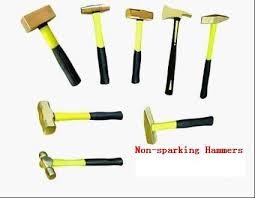
Non-sparking tools:
"Non-sparking", "spark reduced", "spark-resistant" or "spark-proof" tools are names given to tools made of metals such as brass, bronze, Monel metal (copper-nickel alloy), copper-aluminum alloys (aluminum bronze), or copper-beryllium alloys (beryllium bronze).
Commonly used hand tools are often manufactured of steel alloys. Preferred "non-sparking" metals have less tensile strength than steels usually used to make tools. A lower tensile strength means the metal has less strength or resistance to tearing apart when stretched under test conditions. It also means that these tools are softer, wear down more quickly than ordinary steel tools, and have to be dressed more frequently.
Important thing to know about "non-sparking" tools:
Non-sparking tools also generate sparks sometimes referred to as “cold sparks”. These cold sparks have a low heat level and do not ignite carbon disulfide, which has the lowest ignition point of any substance known to man. Therefore while “non-sparking” tools may lower the risk of a spark, they do not eliminate the possibility of sparks. The name "non-sparking" is misleading because these tools are capable of producing a spark: the term "reduced-sparking tools" better describes these tools.
Non-metals like wood, leather, and plastic are suitable for some tools like shovels, scrapers or scoops and do not pose a friction spark hazard.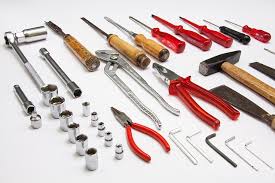
Non-sparking tools provide protection against fires and explosions in environments where there is a concern about sparks igniting flammable solvents, vapors, liquids, dusts or residues. There are many standards and recommendations that have been published by OSHA (Occupational Health and Safety Administration) and NFPA (National Fire Protection Association) that advise the use of non-sparking tools in hazardous environments.
NOTE: It is important to assess each situation carefully & use the appropriate tools for the hazards that are present. In some cases, “non-sparking” tools may still be able to produce a spark. Contact the tool manufacturer, and the producer of the flammable material (for example) for recommendations and more information.
Hazards of both "sparking" and "non-sparking" tools?
Both "sparking" and "non-sparking" materials can cause ignition. Two types of hazards are associated with tools manufactured of either material:
- Ignition by friction, with impact on each other or on other materials such as steel or concrete, in which an "ordinary" (mechanical or frictional) spark is generated. All tools can ignite flammable mixtures by sparks generated by friction or impact. However, this is true only when the generated spark is incendive: that means a spark that has to have enough heat content (i.e., enough mass and sufficiently high temperature) and has to last long enough to heat a flammable air-vapour mixture above its ignition temperature. This is more likely in the case of sparks formed when using a metal grinder that a spark generated when a hammer strikes some metal.
- Ignition by a chemically-generated spark, caused by impact between certain metals and some oxygen-containing substances (such as rust, which is iron oxide).
Use and maintain "non-sparking" tools?
Follow the guidelines below to reduce the risk of explosion and fire.
- Make sure all "non-sparking" tools are kept clean and free from ferrous or other contaminants, which may hamper the non-sparking properties.
- Do not use non-sparking hand tools in direct contact with acetylene, which may form explosive acetylides, especially in the presence of moisture.
- Use local or mechanical ventilation systems as appropriate to remove hazardous materials, dusts and vapors from the workplace.
- Follow normal safety procedures when sharpening non-sparking tools such as the provision of eye and face protection, adequate extraction and dust collection facilities.
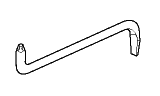
Pipe Tools - Wrenches, Cutters, Reamers, and Threaders:
Pipe tools are made in various shapes and sizes and for many uses. Always use the correct tool for the job.
- Wear safety glasses or goggles, or a face shield (with safety glasses or goggles), when necessary.
- Select a pipe wrench with sufficient capacity and leverage to do the job.
- Use a pipe wrench to turn or hold a pipe. Never use a pipe wrench to bend, raise or lift a pipe.
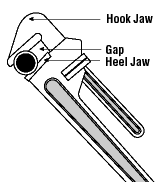
- Adjust the pipe wrench grip to maintain a gap between the back of the hook jaw and the pipe. This concentrates the pressure at the jaw teeth, producing the maximum gripping force. It also aids the ratcheting action.
- Inspect pipe wrenches periodically for worn or unsafe parts and replace them (e.g., check for worn threads on the adjustment ring and movable jaw).
- Keep pipe wrench teeth clean and sharp.
- Face a pipe wrench forward. Turn wrench so pressure is against heel jaw.
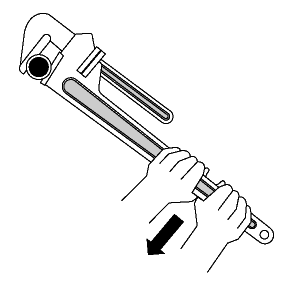
- Pull, rather than push on the pipe wrench handle. Maintain a proper stance with feet firmly placed to hold your balance.
Avoid doing when using pipe wrenches?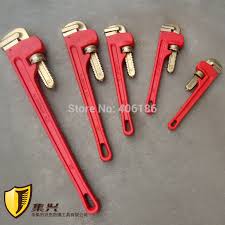
- Do not use a pipe wrench as a hammer, or strike a pipe wrench with a hammer.
- Do not use pipe wrenches on nuts and bolts.
- Do not use a pipe extender for extra leverage. Get a larger pipe wrench.
Safety tips for using pipe cutters, reamers, threaders:
- Replace pipe cutter wheels which are nicked or otherwise damaged.
- Use a 3- or 4-wheeled cutter, if there is not enough space to swing the single wheel pipe cutter completely around the pipe.
- Choose a cutting wheel suitable for cutting the type of pipe material required:
- Thin wheel for cutting ordinary steel pipe.
- Stout wheel for cutting cast iron.
- Other wheels for cutting stainless steel, plastic and other materials.
- Select the proper hole diameter and correct tap size to tap a hole. The hole should be sized so that the thread cut by the tap will be about 75% as deep as the thread on the tap.
- Use a proper tap wrench (with a "T" handle) for turning a tap.
- Use lubricant or machine cutting fluid with metals other than cast iron.
Dont's
- Do not allow chips to clog the flutes (groves in the tap that allow metal chips to escape from the hole). The chips may prevent the tap from turning - this may result in the tap breaking if you continue to apply pressure.
- Do not use a conventional adjustable wrench for turning a tap - it will cause uneven pressure on the tap that may cause it to break.
- Do not attempt to thread hardened steel. This can chip or damage the die.
- Do not thread any rod or other cylindrical object that is larger in diameter than the major diameter of the die thread.
- Do not use a spiral reamer on a rotating pipe. The reamer may snag and cause serious injury.
Pliers and Wire Cutters:
Pliers are made in various shapes and sizes and for many uses. Some are used for gripping something round like a pipe or rod, some are used for twisting wires, and others are designed to be used for a combination of tasks including cutting wire. There are also tools that are used just for cutting wires (as opposed to wire cable and rope). Use the correct pliers or wire cutters for the job.
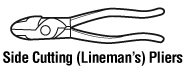
Proper use of side cutting (lineman's) pliers:
- Many applications including electrical, communications and construction work.
- Use to grip, splice or cut wires, and strip insulation.
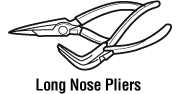
Proper use of long nose pliers:
- Use to grip small objects, reach awkward places, holding wires, bend loops, and attach wires.
- Work involving smaller gauge wire.
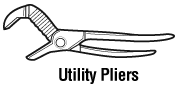
Proper use of utility pliers:
- Use to grip round square, flat and hexagonal objects.
- Can apply limited torque (twisting force) without damaging the work.
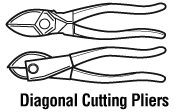
Proper use of diagonal cutting pliers:
- For work involving cutting and skinning wires, cutting and removing pins, nails and other fasteners.
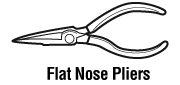
Proper use of flat nose pliers:
- Common pliers, used in many applications and assembly work.
- Use to grip, turn and bend wires.
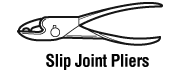
Proper use of slip joint pliers:
- Used to adjust nuts or bolts.
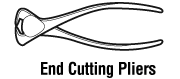
Proper use of end cutting pliers
- Use for cutting wires, nails, rivets close to work.
Safety tips to know when using pliers and wire cutters:
- Wear safety glasses or goggles, or a face shield (with safety glasses or goggles) whenever there is a potential hazard from flying particles, pieces of wire, etc.
- Cut at right angles. Never rock the cutting tool from side to side or bend wire back and forth against the cutting edges.
- Choose pliers or wire cutters that have a grip span of 6 cm - 9 cm (2 1/2 - 3 1/2 in.) to prevent your palm or fingers from being pinched when the tools are closed.
- Use adjustable pliers that allow you to grip the workpiece firmly while maintaining a comfortable handgrip (i.e., hand grasp is not too wide).
- Use tools only if they are in good condition.
- Make sure that the cutting edges are sharp. Dull and worn down cutting edges require many times more force needed for cutting.
- Make sure that the toothed jaws are clean and sharp. Greasy or worn down jaws can result in compromised safety. Such tools also require increased force to hold the workpiece which, in turn, increases the risk of muscular fatigue and repetitive strain injuries.
- Oil pliers and wire cutters regularly. A drop of oil on the hinge will make the tools easier to use.
- Pull on the pliers; do not push away from you when applying pressure. If the tools slips unexpectedly, you may lose your balance or hit your hand against equipment or something else hard that could result in an injury.
Dont's on pliers and wire cutters:
- Do not cut hardened wire unless the pliers or wire cutters are specifically manufactured for this purpose.
- Do not expose pliers or wire cutters to excessive heat.
- Do not bend stiff wire with light pliers. Needle nose pliers can be damaged by using the tips to bend large wire. Use a sturdier tool.
- Do not use pliers as a hammer.
- Do not hammer on pliers or wire cutters to cut wires or bolts.
- Do not extend the length of handles to gain greater leverage. Use a larger pair of pliers for gripping or a bolt cutter for cutting.
- Do not use cushion grip handles for jobs requiring tools with electrically insulated handles. Cushion grips are for comfort primarily and do not protect against electric shock.
- Do not use pliers on nuts and bolts; use a wrench.
Screwdrivers:
Screwdrivers are made in various shapes and sizes and for many uses. Use the correct screwdriver for the job.
- Always match the screwdriver to the screw head, both in terms of size and type.
- Choose contoured handles that fit the shank tightly, with a flange to keep the hand from slipping off the tool.
- Use a slot screwdriver with a blade tip width that is the same as the width of slotted screw head.
- For cross head screws, use the correct size and type of screwdriver: a Phillips screwdriver may slip out of a screw head designed for use with the slightly, flatter-tipped Pozidriv screwdriver.
- Use a vise or clamp to hold the stock if the piece is small or moves easily.
- Wear safety glasses or a face shield (with safety glasses or goggles) that is appropriate for the hazards of the work you are doing.
- Keep the screwdriver handle clean. A greasy handle could cause an injury or damage from unexpected slippage.
- Shut off electricity before beginning work on electrical equipment (lock out, de-energize and tag out).
- If work must be carried out on "live" equipment, use screwdrivers that have insulated handles designed for electrical work and a non-conducting shaft. Remember, most plastic handles are designed for grip and comfort.
- Use non-magnetic tools when working near strong magnets (e.g., in some laboratories).
- Use a screw-holding screwdriver (with screw-holding clips or magnetic blades) to get screws started in awkward, hard-to-reach areas. Square-tipped screwdrivers (e.g., Robertson) that hold screws with recessed square holes are also useful in such situations.
- Use an offset screwdriver in close quarters where a conventional screwdriver cannot be used.
Offset Screwdriver:
- Use a screwdriver that incorporates the following features when continuous work is needed:
- A pistol grip to provide for a straighter wrist and better leverage.
- A "Yankee drill" mechanism (spiral ratchet screwdriver or push screwdriver) which rotates the blade when the tool is pushed forward.
- A ratchet device to drive hard-to-move screws efficiently.
- Or use a powered screwdriver.
Yankee Drill Mechanism with a Pistol Grip
- File a rounded tip square making sure the edges are straight. A dull or rounded tip can slip out of the slot and cause hand injury or damage to materials.
- Store screwdrivers in a rack or partitioned pouch so that the proper screwdriver can be selected quickly.
Dont's on screwdriver:
- Do not lean or push on a screwdriver with any more force than necessary to keep contact with the screw. A screw properly piloted and fitted will draw itself into the right position when turned. Keep the shank directly over the screw being driven.
- Do not hold the stock in one hand while using the screwdriver with the other. If the screwdriver slips out of the slot, you may cut your hand.
- Do not hammer screws which cannot be turned.
- Do not grind the tip to fit all sizes of screw heads.
- Do not try to use screwdrivers on screw heads for which they are not designed (e.g., straight blade screwdrivers on Phillips, clutch head, Torx or multi-flutted spline screw heads).
- Do not use defective screwdrivers (i.e., ones with rounded or damaged edges or tips; split or broken handle; or bent shaft).
- Do not use a screwdriver for prying, punching, chiseling, scoring, scraping or stirring paint.
- Do not use pliers on the handle of a screwdriver for extra turning power. A wrench should only be used on the square screwdriver shank designed for that purpose.
- Do not expose a screwdriver blade to excessive heat. Heat can affect the temper of the metal and weaken the tool.
- Do not use a screwdriver to check if an electrical circuit is live. Use a suitable meter or other circuit testing device.
- Do not carry screwdrivers in your pockets.
Snips:
Snips are made in various shapes and sizes for various tasks. The handle can be like those on scissors with finger and thumb holes or like plier handles. Models are available for cutting in straight lines, in curves to the left or curves to the right.
- Universal snips can cut in both straight and wide curves.
- Straight snips and duckbill snips (flat blade, "perpendicular" to the handle, with pointed tips) are designed to cut in straight lines; some duckbill snips are designed for cutting curved lines.
- Hawk's bill snips (with crescent-shaped jaws) are used for cutting tight circles.
- Aviation snips have compound leverage that reduces the effort required for cutting.
- Offset snips have jaws that are set at an angle from the handle.
DO
- Select the right size and type of snips for the job; check the manufacturer's specifications about the intended use of the snips (e.g., type of cut - straight, wide curve, tight curve, right or left, and maximum thickness and kind of metal or other material that can be cut).
- Only use snips that are sharp and in good condition.
- Wear safety glasses or goggles, or a face shield (with safety glases or goggles) and protective gloves when working with snips. Small pieces of metal may go flying in the air and the cut edges of metal are sharp.
Left cut snips are for making cuts to the left and straight cuts.
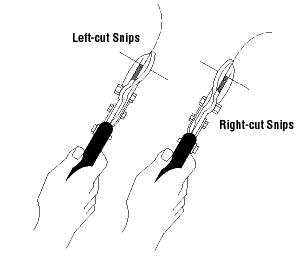
Right cut snips are for making straight cuts and cuts to the right.
Offset snips permit you to keep your hands safely above the cut while cutting directly through the centre of a large sheet.
- Use snips for cutting soft metal only. Hard or hardened metal should be cut with cutting tools designed for that purpose.
- Use ordinary hand pressure for cutting. If extra force is needed, use a larger tool.
- Cut so that the waste is on the right if you are right-handed or on the left if you are left-handed.
- Avoid springing the blades. This results from trying to cut metal that is too thick or heavy for the snips you are using.
- Keep the nut and the pivot bolt properly adjusted at all times.
- Oil the pivot bolt on the snips occasionally.
- Use the locking clip (if available) to keep the snips closed when not in use.
Dont's on snips:
- Do not try to cut sharp curves with straight cut snips.
- Do not cut sheet metal thicker than the manufacturer's recommended upper limit (e.g., cuts up to 16 gauge cold rolled steel or 18 gauge stainless steel).
- Do not extend the length of handles to gain greater leverage.
- Do not hammer or use your foot to exert extra pressure on the cutting edges.
- Do not use cushion grip handles for tasks requiring insulated handles. They are for comfort primarily and not for protection against electric shocks.
- Do not attempt to resharpen snips in a sharpening device designed for scissors, garden tools or cutlery.
Struck Tools:
Safety tips to know when using a struck tool:
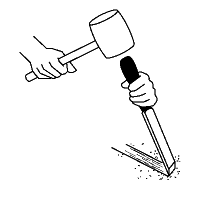
Struck tools are made in various shapes and sizes and for many uses and include cold chisels, punches, nail sets, rock and star drills, and wedges. Use the correct tool for the job.
DO
- Wear safety glasses or goggles, or a face shield (with safety glasses or goggles).
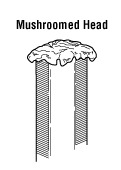
- Use the tools only if they are good condition (i.e., cutting edges are sharp, struck head is not mushroomed or chipped).
- Hold the chisel, for shearing and chipping, at an angle which permits the bevel of the cutting edge to lie flat against the shearing plane.
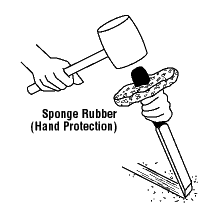
- Provide hand protection
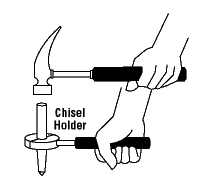
- Hand protection can be provided by a sponge rubber shield forced onto the shaft of a chisel or select struck tools that come with hand protectors designed for the tool.
- Punch and chisel holders are also available.
- Discard tools which are bent, cracked or chipped.
- Redress striking tools with burred or mushroomed heads.
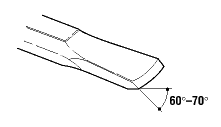
Redress the point or cutting edge to its original shape. Grind to a slightly convex cutting edge. The point angle of the chisel should be 70° for hard metals, 60° for soft.
Dont's on struck tool:
- Do not use struck tools if the struck end is chipped or mushroomed.
- Do not use struck tools if the cutting edge is dull or chipped or if the point of a punch is slanted or damaged.
- Do not apply too much pressure to the head when grinding a chisel. The heat generated can remove the temper. Immerse the chisel in cold water periodically when grinding.
- Do not use cold chisels for cutting or splitting stone or concrete.
- Do not use a drift pin punch (also called an aligning punch) as a pin punch intended for driving, removing, or loosening pins, keys, and rivets.
- Do not allow bull point chisels to be hand-held by one employee and struck by another. Use tongs or a chisel holder to guide the chisel so that the holder's hand will not be injured.
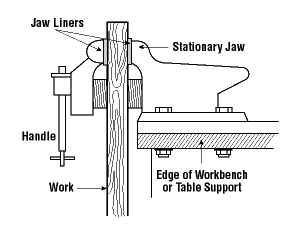
Vises:
A vise, sometimes called the third hand, is an indispensable tool in the tool room or workshop. Vises are usually mounted on workbenches or similar firm supports to hold material in place.
Most vises can be used for a wide variety of work. Select the most suitable vise which is strong enough for the work.
- Wear safety glasses or goggles, or a face shield (with safety glasses or goggles) when using striking tools or power tools on a workpiece held by a vise.
- Attach a vise securely. Place bolts in all the holes in the base of the vise. Use lock washers under the nuts.
- Mount a vise so that the stationary jaw projects slightly beyond the edge of the workbench. This allows long work to be clamped in the vise without interference from the edge of the workbench.
- Ensure that the workbench is firmly secured to its base.
- Check the vise for cracks or other damage before clamping a workpiece in it.
- Use a vise large enough to hold the work without strain.
- Place the workpiece in the vise so that the full clamping surface of the jaw supports the workpiece.
- Keep the workpiece in the vise close as possible to the jaws to prevent vibration when sawing, filing, etc.
- Support the end of extra long work with an adjustable stand, saw horse, or box rather than putting extra strain on the vise.
- Keep all threaded and moving parts clean, oiled and free of chips and dirt.
- Use jaw liners in a vise where there is any possibility of marking the work.
- Replace a bent handle and worn jaw inserts.

Dont's on vise:
- Do not weld the base of the vise to any metal.
- Do not repair a vise by welding or brazing.
- Do not try to bend a heavy rod in a light vise.
- Do not cut into the jaws.
- Do not apply heavy pressure at the corner of the vise jaws.
- Do not use a handle extension (e.g., a pipe) for extra clamping pressure.
- Do not hammer on the handle to tighten beyond hand pressure.
- Do not use the jaws of the vise as an anvil.
- Do not use any vise that has the slightest crack.
- Do not unscrew or open the jaws of the vise wider than they were designed to be used.
Wood Chisels:
Wood chisels are made in various shapes and sizes and for many uses. Use the correct chisel for the job.
- Wear safety glasses, or goggles, or a face shield (with safety glasses or goggles).
- Use the right size of chisel for the job.
- Choose smooth, rectangular handles that have no sharp edges and are attached firmly to the chisel.
- Ensure that the cutting edge is sharp. Dull chisels can be difficult to control and require more effort to do the job.
- Check stock thoroughly for knots, staples, nails, screws or other foreign objects before chiseling.
- Clamp stock so it cannot move.
- Adjust your stance so that you do not lose your balance if the tool slips.
- Chip or cut away from yourself.
- Keep your hands and body behind the cutting edge.
- Use a wooden or plastic mallet with a large striking face on all chisels. Only heavy-duty or framing chisels are made of a solid or molded handle that can be struck with a steel hammer.
- Make finishing or paring cuts with hand pressure alone.
- Place chisels safely within the plastic protective caps to cover cutting edges when not in use.
- Replace any chisel that is bent or shows dents, cracks, chips, or excessive wear.
- Store chisels in a "storage roll," a cloth or plastic bag with slots for each chisel, and keep them in a drawer or tray.
- Replace broken or splintered handles.
- Sharpen cutting edges as often as necessary.
Don t's on Chisels:
- Do not use a wood chisel as a pry or a wedge.
- Do not use a wood chisel on metal.
- Do not use an all-steel chisel with a mushroomed face or a chipped edge. Redress with a file or whetstone.
- Do not use a grinder to redress heat-treated tools. Use a whetstone.
- Do not use a dull chisel.
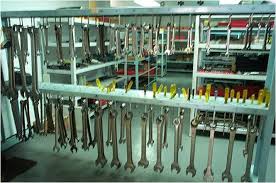
Wrenches:
Wrenches are made in various shapes and sizes and are used for gripping, fastening, turning, tightening and loosening things like pipes, pipe fittings, nuts and bolts. There basically two major kinds of wrenches:
- Pipe wrenches used in plumbing for gripping round (cylindrical) things.
- General use wrenches used on nuts and bolts that have flat, parallel surfaces; e.g., square or hexagonal (hex).
Wrenches may be adjustable to fit different sized pipes, nuts and bolts or may be a fixed size.
Adjustable wrenches include:
- Pipe wrenches.
- Crescent (TM) wrenches which have adjustable jaws set at a 30 degree angle from the handle. Although Crescent is a trade name, it is widely used to refer to any regular adjustable wrench with an angled jaw regardless of who manufactured it.
- Monkey wrenches which have their adjustable head at a 90 degree angle from the handle.
Fixed-sized wrenches include:
- Open ended wrenches that have "jaws" with parallel sides or tines that fit snugly on nuts and bolts.
- Closed end or box wrenches that have a loop at the end with notches on the inside that allow the wrench to fit either square or hex nuts or both (depending on the number of notches or points).
- Combination wrenches that have both an open end and a closed end on either end of the wrench; usually they fit the same size nut or bolt.
- Socket wrenches are like closed end wrenches except they are cylindrical in shape. They can fit over a nut in a recessed hole that would be inaccessible with open or closed ended wrenches. These have an offset handle at right angles to the nut being tightened or loosened. Usually the handle is a ratchet-type handle that allows the user to turn the socket continuously in one direction by moving the handle back and forth without having to take the socket off the nut.
- Torque wrenches, one type of socket wrenches, have a built-in spring-loaded indicator that shows how much torque being is being applied (i.e., shows how hard the nut is being tightened).
- Nut drivers, another type of socket wrenches, are sockets that can be snapped on or permanently fixed to a screwdriver-type handle.
- Allen wrenches or Allen keys are hexagon-shaped (six-sided) metal shafts that are bent into an L-shape for leverage. Hex drivers are "straight Allen wrenches" that have a screwdriver-type handle. These are different from the other wrenches since they fit inside a recessed hexagonal hole in screw heads instead of around a nut or bolt.
Fixed wrenches fit single, specific sizes. Metric wrench sizes are expressed as whole numbers (e.g., 8, 10, 14, 32) that correspond to the sizes in millimetres. Non-metric sizes used widely in the U.S. are also called S.A.E (Society of Automotive Engineers) sizes and are expressed as fractions of an inch; e.g., 1/4, 1/2, 3/4, 1 1/4. Since both metric and S.A.E. fasteners (nuts, bolts, etc.) are used in Canada, users must select the correct type and size of wrench to prevent injuries and damage to equipment in case of slippage when force is applied to the wrench.
General safety tips when using wrenches:
- Use the correct wrench for the job - pipe wrenches for pipes plumbing fittings, and general use wrenches for nuts and bolts.
- Discard any damaged wrenches (e.g., open ended wrenches with spread jaws or box wrenched with broken or damaged points).
- Select the correct jaw size to avoid slippage.
- Wear safety glasses or a face shield (with safety glasses or goggles) where there is a likely hazard of flying particles or falling debris.
- Position your body in a way that will prevent you from losing balance and hurting yourself if the wrench slips or something (e.g., a bolt) suddenly breaks.
- Use a box or socket wrench with a straight handle, rather than an off-set handle, when possible.
- Ensure that the jaw of an open ended wrench is in full contact (fully seated, "flat", not tilted) with the nut or bolt before applying pressure.
- When turning with an adjustable wrench, the direction of the turn should be against (towards) the permanent jaw.
- Ensure that the teeth of a pipe wrench are sharp and free of oil and debris and that the pipe or fitting is clean to prevent unexpected slippage and possible injuries.
- Apply a small amount of pressure to a ratchet wrench initially to ensure that the ratchet wheel (or gear) is engaged with the pawl (a catch fitting in the gear) for direction you are applying pressure.
- Support the head of the ratchet wrench when socket extensions are used.
- Pull on a wrench using a slow, steady pull; do not use fast, jerky movements.
- Stand aside when work is done with wrenches overhead.
- Make sure adjustable wrenches do not "slide" open during use.
- Keep tools well maintained (cleaned and oiled).
- Clean and place tools and wrenches in a tool box, rack or tool belt after use.
Don t's on wrenches:
- Do not use push on a wrench - losing your balance is more likely if the wrench slips.
- Do not use a wrench that is bent handle or damaged.
- Do not use worn adjustable wrenches. Inspect the knurl, jaw and pin for wear.
- Do not pull on an adjustable wrench that is loosely adjusted.
- Do not use pipe wrenches on nuts or bolts.
- Do not use pipe wrenches for lifting or bending pipes.
- Do not use a wrench on moving machinery.
- Do not use the wrong tools for the job. Never use pliers instead of a wrench or a wrench as a hammer.
- Do not use a make-shift wrench.
- Do not insert a shim in a wrench for better fit.
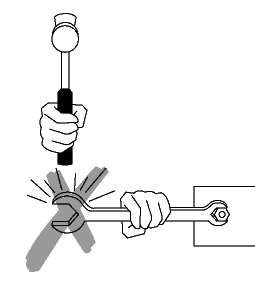
- Do not strike a wrench (except a "strike face" wrench) with a hammer, or similar object, to gain more force.
Click the below link to download hand tools safety materials
Safety Check sheet - Hand Tools
Power point presentation - Hand safety
Power point presentation - Hand tools